A few years ago, when I got my first retina screen equipped mac, I quickly noticed that the screen shots it produced are too big. "Too big" probably isn't the best description. They look great viewed on my machine. But viewed on a lower DPI screen, which is where many screen shots end up because I'm making them as accompaniment to something, they look comically large. Not to mention that making every image 144 DPI when 72 DPI will do takes significantly more disk space and bandwidth.
So the search began for info on how to either reconfigure OS X's screen capture functionality or define my own custom something-or-other to make small screen shots. Google turned up good info and I eventually settled on using Automator to allow a keyboard shortcut to trigger a shell script, the crux of which is a great little utility that ships with OS X called sips combined with screencapture and a handful of variables.
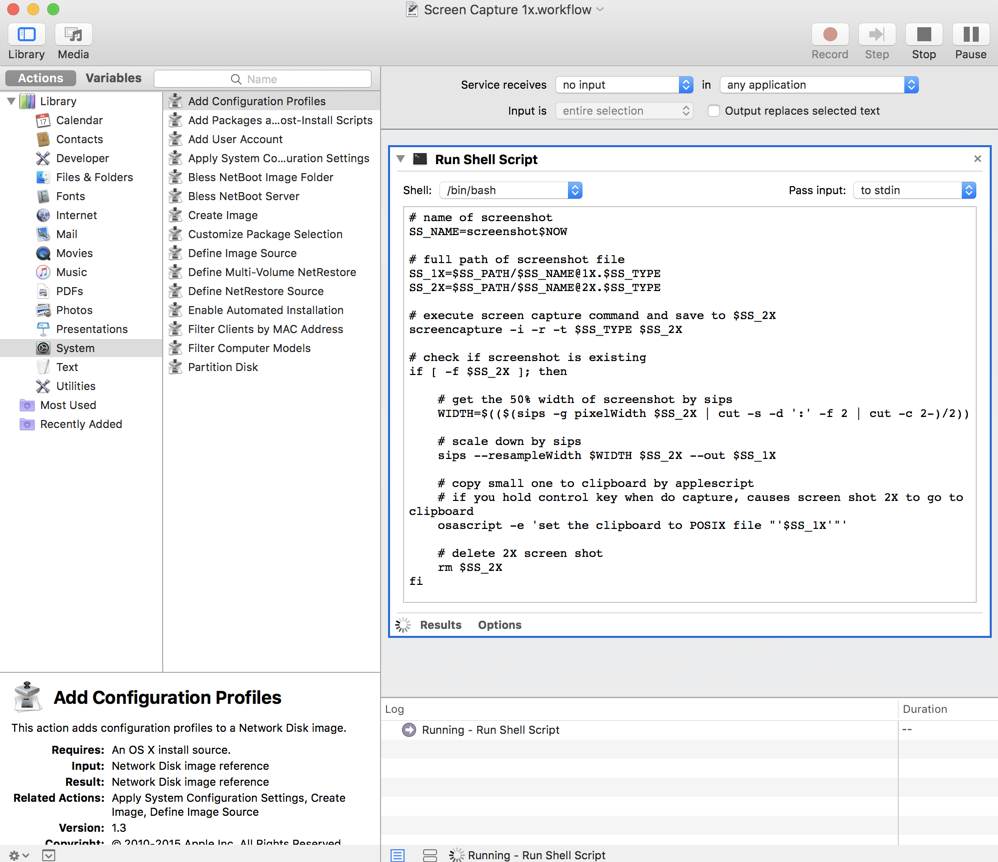
Here's the shell script:
# the path where screenshots to save
# if you want to save them to your desktop, SS_PATH should be "/Users/YOURNAME/Desktop"
SS_PATH="/Users/rutherfordthefake/Desktop"

# a variable of unix timestamp for screenshot file name
NOW=$(date +%s)

# image format to create, default is png (other options include pdf, jpg, tiff and other formats)
SS_TYPE=png

# name of screenshot
SS_NAME=screenshot$NOW

# full path of screenshot file
SS_1X=$SS_PATH/$SS_NAME@1X.$SS_TYPE
SS_2X=$SS_PATH/$SS_NAME@2X.$SS_TYPE

# execute screen capture command and save to $SS_2X
screencapture -i -r -t $SS_TYPE $SS_2X

# check if screenshot is existing
if [ -f $SS_2X ]; then

    # get the 50% width of screenshot by sips
    WIDTH=$(($(sips -g pixelWidth $SS_2X | cut -s -d ':' -f 2 | cut -c 2-)/2))

    # scale down by sips
    sips --resampleWidth $WIDTH $SS_2X --out $SS_1X

    # copy small one to clipboard by applescript
    # if you hold control key when do capture, causes screen shot 2X to go to clipboard
    osascript -e 'set the clipboard to POSIX file "'$SS_1X'"'

    # delete 2X screen shot
    rm $SS_2X
fi
You could mess with the date format or filetype and get slightly different results. The resizing happens on the line that starts with sips.
To make this useful, open Automator (use Spotlight or go find it in /Applications). Click "New Document" and select "Service" for the type of document. Give the "workflow" a name, I use "Screen Capture 1x". In the actions, type "shell" and double click the result called "Run Shell Script". In the shell script window, paste the script from above. Save it. To test, click the "Run" button in the upper-right. You should see the familiar crosshairs that indicate you should click-and-drag to capture part of the screen. Do that and you should end up with an image on your desktop. Setting this up on a new machine, I tested by capturing the Automator window:
Close Automator. Navigate to where the .workflow file is stored and double-click the file to install the service.
Next up is to trigger the Automator workflow from a keyboard shortcut. Go to System Preferences -> Keyboard -> Shortcuts. On the left, select "Services". The workflow that was just installed should be at the very bottom of the list under "General". Click it, then click "add shortcut". Type the shortcut you want to use to trigger the service. Phew. Close System Preferences.
You can now take 1x screen shots using the keyboard shortcut you assigned. I use ctrl + shift + cmd + 6 (⌃⇧⌘ + 6).
Bonus: if you use something like cloud app to manage/share stuff, you can assign another keyboard shortcut to auto-upload the file. For me, that's ctrl + option + v (⌃⌥ + v) which works because the custom service created with Automator also puts the resized image on your clipboard.